Spooky Cauldron Dirt Cups are a fun, easy-to-make dessert that’s perfect for Halloween gatherings. These layered treats combine creamy chocolate pudding, whipped cream, and crunchy cookie crumbs, making them a delightful choice for both kids and adults. With their playful, spooky presentation, they add a festive touch to any celebration!
Why You’ll Love Spooky Cauldron Dirt Cups
- Easy to Make: With just a few simple ingredients, you can whip up these fun treats in no time, making them perfect for last-minute Halloween festivities.
- No-Bake: Since this recipe doesn’t require any baking, it’s a fantastic option for beginner cooks or anyone on a tight schedule.
- Customizable: You can easily personalize these dirt cups with various toppings and decorations to match your Halloween theme, making them unique to your celebration.
- Kid-Friendly: Kids will love both making and eating these delicious cups. The combination of flavors and textures keeps them engaged and excited.
- Great for Parties: These treats are easy to prepare in large batches, making them ideal for parties, school events, or any Halloween get-together.
Recipe Overview
- Prep Time: 15 minutes
- Chill Time: 30 minutes
- Total Time: 45 minutes
- Servings: 6
- Difficulty Level: Easy
Ingredients You’ll Need for Spooky Cauldron Dirt Cups
- Chocolate Pudding Mixture:
- 1 package of chocolate pudding mix
- 2 cups of milk
- Layering Components:
- 1 package of chocolate sandwich cookies (crushed)
- 1 cup of whipped cream
- Optional Decorations:
- Gummy worms
- Edible decorations (graveyard-themed or Halloween-themed)

How to Make Spooky Cauldron Dirt Cups
- Prepare the Pudding: In a bowl, whisk together the chocolate pudding mix and milk until smooth. Refrigerate for about 5 minutes to allow it to thicken.
- Crush the Cookies: Place the chocolate sandwich cookies in a plastic bag and crush them into fine crumbs using a rolling pin or your hands.
- Layer the Ingredients: In cups or dessert bowls, start layering by adding a spoonful of chocolate pudding at the bottom.
- Add the Whipped Cream: Next, add a layer of whipped cream followed by a layer of crushed cookie crumbs.
- Repeat Layers: Continue layering until the cups are filled, finishing with a generous sprinkle of cookie crumbs on top.
- Decorate: Top with gummy worms and any other edible graveyard-themed decorations you desire.
- Chill and Serve: Chill the dirt cups in the refrigerator until you’re ready to serve them. Enjoy these delightful treats perfectly chilled!
Tips for Success
- Whipping Cream: If you’re using store-bought whipped cream, make sure to gently fold it into layers to maintain its airy texture.
- Pudding Thickness: If your pudding isn’t thickening as expected, allow it to sit a few extra minutes in the fridge.
- Crushing Cookies: Aim for fine crumbs to ensure even distribution in each cup, enhancing the texture throughout the dessert.
- Layering Technique: Use clear cups to show off the layers for a visually appealing presentation that kids will love.
- Chilling Time: Give the desserts a good 30 minutes to chill in the fridge, as this helps the flavors meld together.
Easy Variations
- Chocolate Variations: Swap out the chocolate pudding with vanilla or a flavored pudding like butterscotch for a different twist.
- Add Fruit: Layer in some fresh berries or banana slices between the pudding and cream for added flavor.
- Customize Toppings: Use crushed graham crackers or even colored sprinkles on top for a different texture and festive look.
- Make it Dairy-Free: Substitute the chocolate pudding with a non-dairy version and use coconut or almond milk for a dairy-free treat.
- Halloween Themes: Use orange food coloring to color your whipped cream or add festive edible decorations to match your Halloween theme.
What to Serve with Spooky Cauldron Dirt Cups: Perfect Halloween Treats!
- Pumpkin Spice Cookies: Their warm flavors complement the chocolate pudding perfectly.
- Caramel Apples: A crunchy, sweet, and slightly tart treat that balances the dessert’s creaminess.
- Ghostly Cupcakes: Fun and festive, adding variety to your Halloween table.
- Fruit Platter: Fresh fruit can offer a refreshing contrast to the rich dirt cups.
- Hot Chocolate: Serve with whipped cream and marshmallows for a cozy beverage pairing.
Storage and Reheating
- Refrigerator Storage: Store any leftovers in an airtight container in the refrigerator for up to 3 days.
- Freezer Storage: It’s best not to freeze these cups as the texture of the pudding and whipped cream may change.
- Texture Preservation: To maintain texture, keep layers assembled until serving; avoid storing already layered cups for extended periods.
Common Mistakes to Avoid
- Overmixing: When combining pudding and milk, whisk just until smooth. Overmixing can lead to a thinner consistency.
- Stale Cookies: Ensure your chocolate cookies are fresh. Stale cookies won’t crush easily or maintain the right texture in the dessert.
- Skipping Chilling: Don’t skip chilling the pudding; it’s crucial for achieving the right texture and flavor.
- Too Many Layers: Keep layers balanced; too many can make the dessert overly rich.
- Rushing Assembly: Assemble quickly but thoughtfully, allowing the pudding layers to stay firm and distinct.
Spooky Cauldron Dirt Cups: Background & Cultural Inspiration
This whimsical dessert plays on the traditional "dirt cup" concept, commonly found at children’s parties and Halloween events. Its Halloween twist draws inspiration from spooky lore, showcasing playful elements like gummy worms and graveyard decorations, which reflect the festive spirit of Halloween. These treats exemplify how food can blend fun with creativity, making dessert an exciting experience for everyone involved.
Frequently Asked Questions
Can I make these dirt cups ahead of time?
Yes, you can prepare the pudding and crush the cookies the day before and assemble the dirt cups a few hours before serving.
Can I use a different type of cookie?
Absolutely! Oreos or chocolate graham crackers also work well for this dessert.
Is there a gluten-free version of these dirt cups?
Opt for gluten-free chocolate pudding and use gluten-free cookies to accommodate dietary needs.
How can I store leftover dirt cups?
Store them in an airtight container in the fridge for up to 3 days, though they’re best enjoyed fresh.
What’s the best way to serve these cups at a party?
For parties, prepare individual servings in clear cups to showcase the layers, making them visually appealing and easy for guests to grab.
Final Thoughts
Spooky Cauldron Dirt Cups are a cheerful and hassle-free dessert that brings a festive atmosphere to any Halloween gathering. Their layered textures and delightful decorations create a fun experience for both making and eating. Whether you’re hosting a party or looking for a simple treat to enjoy with family, this recipe is a charming choice that’s sure to be a hit!
PrintSpooky Cauldron Dirt Cups
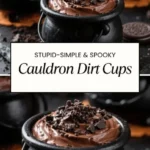
A fun and easy no-bake dessert combining chocolate pudding, whipped cream, and cookie crumbs, perfect for Halloween gatherings.
- Prep Time: 15 minutes
- Cook Time: 0 minutes
- Total Time: 45 minutes
- Yield: 6 servings
- Category: Dessert
- Method: No-Bake
- Cuisine: American
- Diet: Vegetarian
Ingredients
- 1 package of chocolate pudding mix
- 2 cups of milk
- 1 package of chocolate sandwich cookies (crushed)
- 1 cup of whipped cream
- Gummy worms (optional)
- Edible decorations (graveyard-themed or Halloween-themed) (optional)
Instructions
- Prepare the pudding: In a bowl, whisk together the chocolate pudding mix and milk until smooth. Refrigerate for about 5 minutes to allow it to thicken.
- Crush the cookies: Place the chocolate sandwich cookies in a plastic bag and crush them into fine crumbs using a rolling pin or your hands.
- Layer the ingredients: In cups or dessert bowls, start layering by adding a spoonful of chocolate pudding at the bottom.
- Add the whipped cream: Next, add a layer of whipped cream followed by a layer of crushed cookie crumbs.
- Repeat layers: Continue layering until the cups are filled, finishing with a generous sprinkle of cookie crumbs on top.
- Decorate: Top with gummy worms and any other edible graveyard-themed decorations you desire.
- Chill and serve: Chill the dirt cups in the refrigerator until you’re ready to serve them. Enjoy these delightful treats perfectly chilled!
Notes
Store leftovers in an airtight container for up to 3 days. Avoid freezing to maintain texture.