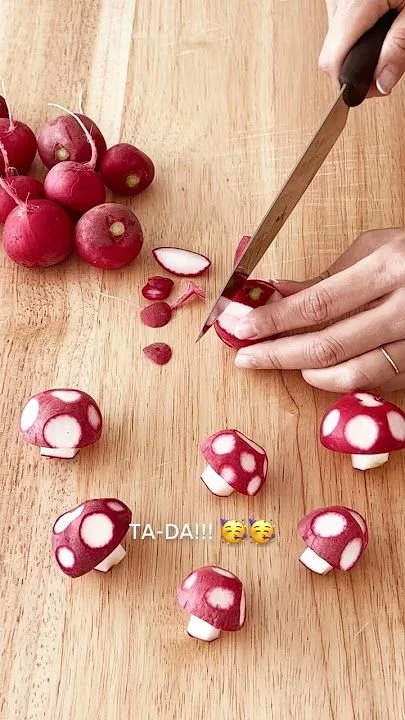
Making DIY radish mushrooms is a delightful way to impress your guests with an unexpected twist on a classic ingredient. These whimsical yet tasty creations are not only visually appealing but also bursting with flavor, making them an exciting addition to any meal or gathering.
Why You’ll Love DIY Radish Mushrooms
- Unique Presentation: These radish mushrooms add an eye-catching element to your table, transforming a simple vegetable into a gorgeous centerpiece.
- Fresh Flavor: The mild spiciness of the radish complements dishes beautifully, providing a crisp texture and a pop of color.
- Versatile Use: Enjoy them as appetizers, in salads, or as garnishes to elevate your favorite dishes.
- Simple Ingredients: Made from radishes and common pantry items, they are easy to whip up without requiring advanced culinary skills.
- Perfect for Meal Prep: These radish mushrooms can be made in advance, allowing you to save time during busy weeknights or parties.
Recipe Overview
- Prep Time: 15 minutes
- Cook Time: 0 minutes
- Total Time: 15 minutes
- Servings: 4-6 servings
- Difficulty Level: Easy
Ingredients You’ll Need for DIY Radish Mushrooms
- Radishes: 8-10 medium-sized radishes, washed and trimmed
- Opt for firm, fresh radishes without blemishes for the best results.
- Olive oil: 2 tablespoons
- This will help bring out the natural flavors and add a touch of richness.
- Salt: 1 teaspoon
- Enhances the flavor of the radishes.
- White pepper: ½ teaspoon
- Adds a subtle warmth without overpowering the dish; feel free to omit if you prefer a milder taste.
- Balsamic vinegar: 1 tablespoon (optional)
- For those who love a tangy, sweet note, adding balsamic vinegar can elevate the flavor.

here
How to Make DIY Radish Mushrooms
- Prepare the Radishes: Clean the radishes under cold water, removing any dirt. Trim the tops and bottoms to create a flat surface for easier slicing.
- Shape the Mushrooms: Using a small knife, carefully carve the top of each radish to resemble a mushroom cap. You can round the top gently and make small marks on the surface if you like.
- Season: In a bowl, mix the olive oil, salt, white pepper, and balsamic vinegar (if using). Toss the carved radishes in this mixture to coat them evenly.
- Chill: Allow the radish mushrooms to sit for about 10 minutes to absorb the flavors and soften slightly.
- Serve: Arrange your radish mushrooms on a platter and serve immediately. They can also be stored in the fridge for a couple of hours before serving.
Tips for Success
- Use the Right Radishes: Look for medium-sized radishes that are firm and smooth for the best texture and taste.
- Uniform Slicing: Try to carve all the radishes to a similar size for consistent presentation.
- Be Gentle When Carving: Use a sharp knife and take your time to avoid breaking the radishes.
- Taste as You Go: Adjust the seasoning to your liking; you can easily increase the olive oil or vinegar for more flavor.
- Store Properly: Keep unused radish mushrooms in an airtight container in the refrigerator to maintain their crispness.
Easy Variations
- Spicy Version: Add a pinch of cayenne pepper or crushed red pepper flakes to the seasoning mix for a bit of heat.
- Herb-Infused: Mix in fresh herbs like parsley or dill into the olive oil blend for added freshness.
- Stuffed Radish Mushrooms: Fill the carved radish caps with goat cheese, cream cheese, or hummus for a decadent appetizer.
- Colorful Addition: Use multi-colored radishes (like purple or black radishes) for an even more beautiful display.
- Savory Glaze: Instead of balsamic vinegar, drizzle with soy sauce or a soy-sesame mixture for an Asian-inspired flavor.
What to Serve with DIY Radish Mushrooms
- Cheese Platter: Combine with a variety of cheeses for a balanced taste of savory and fresh flavors.
- Fresh Salads: Toss them into mixed greens, adding a new crunchy layer to your favorite salad.
- Charcuterie Board: Their striking appearance makes them a perfect fit for a charcuterie spread, enhancing the visual appeal.
- Dip Selection: Serve alongside a variety of dips, like ranch, hummus, or tzatziki, for a fun dipping experience.
- Grilled Meats: Pair with grilled chicken or steak to provide a fresh contrast to richer flavors.
Storage and Reheating
- Refrigerator Storage: Store any leftover radish mushrooms in an airtight container in the fridge for up to 2 days.
- Freezer Storage: It is not recommended to freeze these radish mushrooms as freezing alters their crunchy texture.
- Best Reheating Method: Enjoy them cold as they are meant to be fresh; reheating is not necessary.
- Preserving Texture: Avoid storing them too long, as they can become limp. Freshness is key.
Common Mistakes to Avoid
- Over-carving: Be cautious not to carve too deeply; leaving some thickness ensures they hold their shape.
- Not Chilling: Skipping the chilling step can result in less flavorful radishes, as they need time to absorb seasonings.
- Poor Quality Radishes: Using old or wilted radishes can lead to a disappointing texture and taste.
- Skipping the Seasoning: Don’t underestimate the impact of seasoning; it brings out the natural flavors of the radish.
DIY Radish Mushrooms: Background & Cultural Inspiration
Radish mushrooms are a creative culinary trend that merges the essence of traditional cooking with modern presentation styles. Often inspired by Japanese cuisine’s emphasis on aesthetics and flavor, this playful dish exemplifies how simple ingredients can be transformed into art. These whimsical mushrooms honor the seasonal harvest of radishes, celebrating freshness and the vibrant colors of nature on our plates. As an appetizer or garnish, they reflect a growing trend of health-conscious eating that appreciates the intrinsic flavors of vegetables.
Frequently Asked Questions
Can I use different types of radishes?
Yes, you can experiment with various radishes like daikon or watermelon radishes for different flavors and colors.
How long can I store the radish mushrooms?
They are best consumed within 1-2 days when stored in the fridge.
Are these radish mushrooms spicy?
The level of spiciness can vary based on the type of radish used, but generally, they have a mild flavor. Adjusting the seasoning can also impact the heat level.
Can I make these ahead of time?
Yes, you can prepare them up to a few hours in advance. Just store them in the fridge until you’re ready to serve.
What if I don’t have balsamic vinegar?
You can substitute it with lemon juice or omit it entirely; the dish will still be flavorful without it.
Final Thoughts
DIY radish mushrooms are an appealing and unique way to bring a touch of creativity to your meals. With their bright appearance and fresh flavor, they are sure to impress at any gathering. Whether enjoyed alone or as part of a more extensive spread, these delightful creations will make your table shine. Try making them for your next event or simply as a fun snack at home. You won’t be disappointed!
PrintDIY Radish Mushrooms
Whimsical and flavorful radish mushrooms that make a stunning appetizer or garnish for any meal.
- Prep Time: 15 minutes
- Cook Time: 0 minutes
- Total Time: 15 minutes
- Yield: 4-6 servings
- Category: Appetizer
- Method: No-Cook
- Cuisine: Fusion
- Diet: Vegetarian
Ingredients
- 8-10 medium-sized radishes, washed and trimmed
- 2 tablespoons olive oil
- 1 teaspoon salt
- ½ teaspoon white pepper
- 1 tablespoon balsamic vinegar (optional)
Instructions
- Prepare the radishes: Clean the radishes under cold water, removing any dirt. Trim the tops and bottoms to create a flat surface for easier slicing.
- Shape the mushrooms: Using a small knife, carefully carve the top of each radish to resemble a mushroom cap. You can round the top gently and make small marks on the surface if you like.
- Season: In a bowl, mix the olive oil, salt, white pepper, and balsamic vinegar (if using). Toss the carved radishes in this mixture to coat them evenly.
- Chill: Allow the radish mushrooms to sit for about 10 minutes to absorb the flavors and soften slightly.
- Serve: Arrange your radish mushrooms on a platter and serve immediately.
Notes
Use firm radishes for the best results. Adjust seasoning and experiment with different types of radishes for variety.