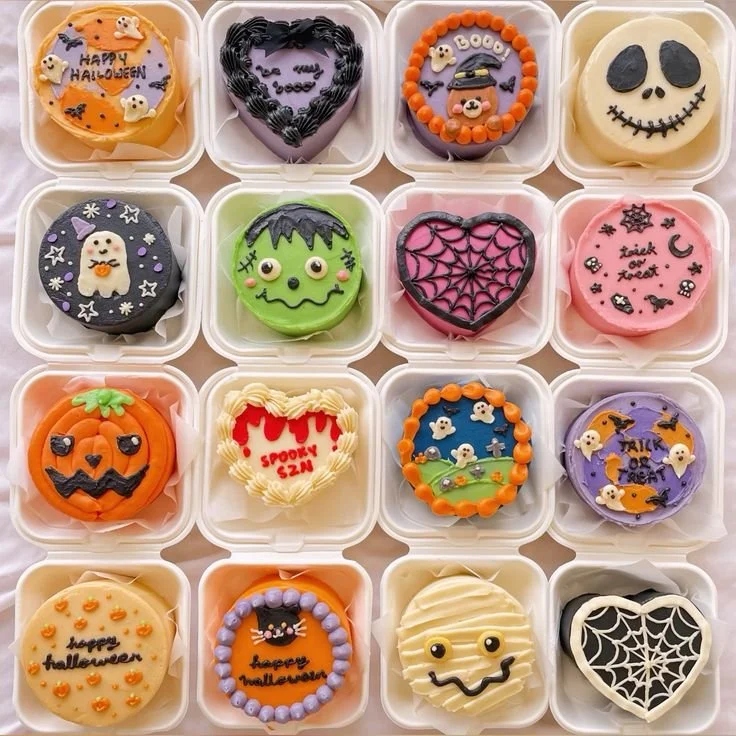
The Halloween Bento Cake is a delightful and festive treat that will surely bring a smile to both kids and adults alike. Not only is it a fun dessert to make, but it’s also perfect for Halloween parties, school snacks, or simply celebrating the spooky season. These adorable bento cakes are easy to customize, making them a fantastic canvas for creativity.
Why You’ll Love Halloween Bento Cake
- Fun and Festive: These bento cakes are designed to capture the spirit of Halloween, making them perfect for parties or school events.
- Easy to Customize: Feel free to get creative with decorations and flavors, making each cake unique to your preferences.
- Perfect Portion Size: Unlike traditional cakes, bento cakes are made in smaller portions, allowing for easy serving and enjoying without the guilt of a full slice.
- Kid-Friendly: The adorable designs and fun flavors make them a hit with children, encouraging them to eat more treats during the spooky season.
- Great for Meal Prep: Easily prepare these cakes ahead of time and store them for busy days or gatherings.
Recipe Overview
- Prep Time: 20 minutes
- Cook Time: 25-30 minutes
- Total Time: 50 minutes
- Servings: 10 bento cakes
- Difficulty Level: Easy
Ingredients You’ll Need for Halloween Bento Cake
-
Wet Ingredients:
- 1 cup unsalted butter, softened (for richness)
- 1 cup granulated sugar (for sweetness)
- 3 large eggs (for structure and moisture)
- 2 teaspoons vanilla extract (for flavor)
-
Dry Ingredients:
- 2 cups all-purpose flour (for the cake base)
- 1 teaspoon baking powder (for leavening)
- 1/2 cup milk (for moisture)
-
Optional Add-ins and Decorations:
- Food coloring (for seasonal colors)
- Sprinkles (Halloween-themed for decoration)
- Whipped cream or icing (for topping)

How to Make Halloween Bento Cake
- Preheat the Oven: Preheat your oven to 350°F (175°C). This ensures an even bake for your cakes.
- Cream the Butter and Sugar: In a large mixing bowl, cream together the softened butter and granulated sugar until the mixture is light and fluffy. This should take about 3-5 minutes.
- Add the Eggs: Incorporate the eggs one at a time, beating well after each addition. This helps create a smooth batter.
- Mix in Vanilla: Add in the vanilla extract and mix until combined.
- Combine Dry Ingredients: In another bowl, whisk together the flour and baking powder until well blended.
- Combine Wet and Dry Mixtures: Gradually add the dry ingredient mixture to the wet mixture, alternating with the milk. Mix just until combined; be careful not to overmix, which can lead to a dense cake.
- Prepare the Baking Dish: Pour the batter into a greased baking dish. Using a spatula, spread the batter evenly for uniform baking.
- Bake: Bake for 25-30 minutes or until a toothpick inserted into the center comes out clean. Make sure to keep an eye on it toward the end to prevent overbaking.
- Cool and Decorate: Once baked, allow the cakes to cool in the pan for about 10 minutes before transferring them to a wire rack to cool completely. Once cool, cut them into small rectangular or round portions, then decorate with whipped cream, icing, and festive toppings.
Tips for Success
- Room Temperature Ingredients: Ensure your eggs and butter are at room temperature for better incorporation and texture.
- Don’t Overmix: Mixing too much once you combine the dry and wet ingredients can lead to a tough texture. Mix just until you don’t see dry flour.
- Customize Flavors: Experiment with different flavor extracts like almond or pumpkin spice for a seasonal twist.
- Keep an Eye on Baking Time: Ovens can vary, so start checking a few minutes early to avoid dry cakes.
- Decoration Options: Use seasonal sprinkles or chocolate shapes to create spooky decorations.
Easy Variations
- Chocolate Version: Substitute half of the flour with unsweetened cocoa powder for a chocolatey base.
- Pumpkin Spice: Add 1 cup of canned pumpkin puree and 1 teaspoon of pumpkin pie spice for a autumn-inspired cake.
- Fruit-Filled: Insert creamy fillings such as raspberry jam or lemon curd between layers for a zesty surprise.
- Dairy-Free Option: Use coconut oil and non-dairy milk to make a delicious dairy-free bento cake.
- Gluten-Free Version: Replace the all-purpose flour with a 1:1 gluten-free baking flour blend.
What to Serve with Halloween Bento Cake
- Hot Chocolate: The rich flavors of hot chocolate pair perfectly with the sweet bento cakes, making for a comforting snack.
- Caramel Apples: This classic fall treat balances the sweetness of the cakes with its tart, crunchy nature.
- Pumpkin Soup: A warm, savory pumpkin soup offers contrast to the sweet treat and keeps the seasonal theme.
- Candy Corn: Offer a small side of candy for those who enjoy the crunchy, sweet bite of this Halloween classic.
- Spiced Apple Cider: The warm spices in apple cider compliment the flavors of the cake while providing a cozy drink option.
Storage and Reheating
- Refrigerator Storage: Store leftover bento cakes in an airtight container in the fridge for up to 3 days.
- Freezer Storage: If freezing, wrap each individual cake in plastic wrap and then in aluminum foil. They can be stored in the freezer for up to 1 month.
- Reheating: If desired, gently reheat in the microwave for 10-15 seconds to enhance the flavors, but avoid overheating, which can dry them out.
Common Mistakes to Avoid
- Overbaking: Keep a close eye on the cakes near the end of the baking time to prevent them from drying out.
- Not Measuring Ingredients Accurately: Baking requires precision; make sure to measure your ingredients properly for the best results.
- Skipping Cooling Time: Allow the cakes to cool completely before decorating to ensure the icing doesn’t melt.
- Inconsistent Size: When cutting the cakes, try to keep the pieces uniform in size for even serving.
- Neglecting to Grease the Pan: Always grease your baking dish to prevent the cakes from sticking.
Halloween Bento Cake: Background & Cultural Inspiration
Halloween Bento Cakes draw inspiration from traditional Japanese bento boxes, which are packed meals that often feature beautifully arranged food. The idea of transforming classic cakes into portable treats fits perfectly with the festive spirit of Halloween, where creativity and presentation matter. The playful designs of these cakes resonate with the holiday’s emphasis on fun, frights, and treats. This fusion of cultures not only celebrates Halloween but also makes incorporating delightful presentation a key part of enjoying these delicious morsels.
Frequently Asked Questions
Can I make these cakes ahead of time?
Yes, you can prepare the cakes up to a day in advance. Store them in an airtight container and decorate them just before serving for the best appearance.
How do I store leftover bento cakes?
Store any leftover bento cakes in an airtight container in the fridge for up to 3 days for optimum freshness.
What can I substitute for eggs?
You can use flax eggs (1 tablespoon of ground flaxseed mixed with 2.5 tablespoons of water) as a substitute for each egg in the recipe.
Can I use different types of flour?
Yes, you can substitute all-purpose flour with a gluten-free blend or whole wheat flour, keeping in mind it may affect texture slightly.
How can I make these less sweet?
To reduce sweetness, you can cut down the sugar or use a tangy cream cheese frosting to balance the flavors.
Final Thoughts
The Halloween Bento Cake is a whimsical and enjoyable treat that not only excites the senses but also invites creativity in the kitchen. Its ease of preparation and adaptability make it a delightful addition to any Halloween celebration. So gather your ingredients and start creating these charming cakes that everyone will love! Whether for a party or just a fun baking day with the kids, this recipe is bound to become a seasonal favorite.
PrintHalloween Bento Cake
A delightful and festive treat perfect for Halloween parties and school snacks, these bento cakes are easy to customize and provide the perfect portion size.
- Prep Time: 20 minutes
- Cook Time: 30 minutes
- Total Time: 50 minutes
- Yield: 10 bento cakes
- Category: Dessert
- Method: Baking
- Cuisine: Japanese
- Diet: Vegetarian
Ingredients
- 1 cup unsalted butter, softened
- 1 cup granulated sugar
- 3 large eggs
- 2 teaspoons vanilla extract
- 2 cups all-purpose flour
- 1 teaspoon baking powder
- 1/2 cup milk
- Food coloring (optional)
- Sprinkles (Halloween-themed, optional)
- Whipped cream or icing (for topping)
Instructions
- Preheat your oven to 350°F (175°C).
- Cream together the softened butter and granulated sugar until light and fluffy.
- Add the eggs one at a time, beating well after each addition.
- Mix in the vanilla extract.
- Combine the flour and baking powder in another bowl.
- Gradually add the dry ingredients to the wet mixture, alternating with the milk.
- Pour the batter into a greased baking dish.
- Bake for 25-30 minutes or until a toothpick inserted comes out clean.
- Cool in the pan for 10 minutes before transferring to a wire rack.
- Cut into portions and decorate with whipped cream, icing, and festive toppings.
Notes
Ensure eggs and butter are at room temperature for better texture. Avoid overmixing to prevent a tough cake.